Posts

Debugging in Protractor

Image
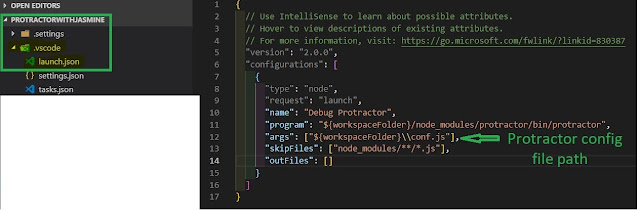
Hello Friends, Today I will share my knowledge on how to debug into Protractor. Debugging:  In software development, debugging involves locating and correcting code errors in a computer program. Follow a below steps to configure a debugging in Protractor. 1.  Navigate to local project node_module => .bin folder  and edit 'protractor' file which don't have extension into Notepad++. Delete an existing data and add below line of code #!/bin/sh process.env.NODE_ENV= process.env.NODE_ENV || 'test';   require('../built/cli.js'); Second line is used to mention the environment such as test or dev which mention in package.json under script tag as below  Third line is used to mention the path of protractor complier CLI means command-line interpreter. 2.  Make sure you browser driver .exe file i.e ' webdriver-manager ' folder available under " \node_modules\protractor\node_modules\ " Project path of local node_module.

Introduction to Protractor

Protractor is an end-to-end test automation framework for Angular and AngularJS applications. Protractor API works as a wrapper over the most powerful Selenium WebDriver API,  hence you will get all advantages that are available in WebDriver API and is built on top of WebDriverJS ie. WebDriver JavaScript that uses native events and browser specific drivers to interact with web based application You can use below Protractor framework: 1. Jasmine (Default) 2. Mocha 3. Cucumber Why Protractor: 1. Angular JS applications have some extra HTML attributes like ng-repeater, ng-controller, ng-model.., etc. which are not included in Selenium locators. Selenium is not able to identify those web elements using Selenium code. So, Protractor can handle and controls those attributes in Web Applications. 2. You cal also automate both AngularJS and Non AngularJS application. 3. Easy to achieve parallel execution by making small changes in config file. 4. It's an open source f

Config file in Protractor

All the Protractor configuration we need to maintain in file named as config file or protractor.config file The configuration file tells Protractor how to set up the Selenium Server, which tests to run, how to set up the browsers, and which test framework to use. The configuration file can also include one or more global settings. The execution of protractor start form config file like below from command prompt. Example: C:\WINDOWS\system32>preotractor conf.js var Jasmine2HtmlReporter = require ( 'protractor-jasmine2-html-reporter' ); let SpecReporter = require ( 'jasmine-spec-reporter' ). SpecReporter ; exports . config = { // launch locally when fields directConnect and seleniumAddress are not  provided // for testing directly against a browser without using a Selenium Server.  applies only to chrome and firefox. directConnect: true , // Framework to use. Jasmine is recommended. framework: 'jasmin

Package.json file in Protractor

Image
Package.json provides a simple way for people to keep track of packages they use in their application. This file is used to give information to npm that allows it to identify the project as well as handle the project's dependencies. It can also contain other metadata such as a project description, the version of the project in a particular distribution, license information, even configuration data - all of which can be vital to both npm and to the end users of the package. The package.json file is normally located at the root directory of a Node.js project.   Prerequisite to create package.json : node js should be installed and setup should be done. 1. Create Project folder as "Framework" in drive. 2. Open a command prompt cmd and navigate to project folder like below C:\WINDOWS\system32> CD "pathOfProjectFolder" Example : CD C:\Users\Framework 3. Execute the "npm init" command. It will ask you a bunch of questions, and then write a

Visual Studio Code setup for Protractor

Image
1. Install VSCode, VSCode is nothing but another version of Visual Studio but available for free. 2. Navigate to  https://code.visualstudio.com/ 3. Click download button 4. Download the VSCode software according to your operating system. 5. Install the VScode like any other exe file, go along with the recommended setting only. 6. Launch the VSCode, and UI will look like below. 7. Install JavaScript and TypeScript language support from "Tool and lanuguages".  8. Click on "Extensions" tab from left side module and install below extensions  Note: This extensions are optional which will be useful for better automation script creation. Angular 6 Snippets - TypeScript, Html, Angular Material, ngRx, RxJS & Flex Layout Cucumber (Gherkin) Full Support Jasmine code snippets JavaScript (ES6) code snippets indent-rainbow Bracket Pair Colorizer

Handling Keyboard actions in Selenium

sendKeys() of WebElement interface can be used to press the specified keys of Keyboard. Keys is the predefined class of WebDriver API We can use below different ways: 1. Using Actions Class Actions action =new Actions(driver); action.sendKeys(Keys.ENTER).build( ).perform( ); 2. Using chrod() predefined method of Keys() class We can simultaneously press multiple keys using chrod() WebElement textPassword= driver.findElement(By.id("txtPassword")); textPassword.sendKeys(Keys.chord(Keys.CONTROL, "a"), Keys.DELETE);

Running Selenium WebDriver without using EXE files

In order to run Selenium WebDriver on Chrome, Firefox, IE etc browser we need to set exe binary file path like below before initiate drivers. System.setProperty("webdriver.chrome.driver", "/absolutepathtobinarychromedriver"); System.setProperty("webdriver.gecko.driver", "/absolutepathtobinarygeckodriver"); If you forgot to set path to the driver executable file using System.setProperty then illegal state exception will occur. To avoid this we can use WebDriverManager in Maven project, you need to add the following dependency in your pom.xml file. <dependency>     <groupId>io.github.bonigarcia</groupId>     <artifactId>webdrivermanager</artifactId>     <version>3.0.0</version>     <scope>test</scope> </dependency> and in Gradle project dependencies {     testCompile("io.github.bonigarcia:webdrivermanager:3.0.0") } WebDriverManager resolves the driver bina